There are wires in wireless networks? Yes, and probably more than you think. For an office’s wireless setup, there are wires and cables that need to be run throughout the entire office. In this post, we will be talking about the basics that are required in order to prepare and execute the pathways and cabling in an office setting.
Materials
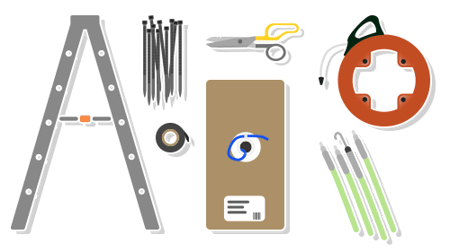
When installing cable, there are some necessary materials that are required to complete an installation.
- Ladder
- Cable
- Electrical tape
- Snips or scissors
- Zip ties
- Glow rod or other push/pull rods
- Fish Tape
- Pull Line
Setting Up
Correctly setting up a work area is crucial to installing cable both easily and effectively. First, place the ladder where you want to start the cable path in the ceiling. This will also be the general area where the access point (AP) will be placed. While keeping it out of the way of the ladder and where people might be walking, place the cable box close enough to the work area that it has a clear path up to the ceiling. Then set up the cable for the first pull by attaching it to the glow rod with electrical tape.
Planning the Pathway
When planning your cable path, you first want to look at the existing pathways above the ceiling. These pathways will likely consist of the existing LAN wires and will help with the planning of any new pathways. As you install new cable, it is best to follow the existing pathways by using cable trays and j-hooks in order to keep everything organized above the ceiling. It can get confusing if wires are going in different directions.

If you are unable to follow the existing pathways, you will still need to keep the cables organized when creating a new path. To keep them organized and manageable, paths needs to be as straight as possible and there should always be 90 degree turns anytime there is a change in direction. A cable’s pathway should never cross diagonally across a building. In an office setting, it is generally easiest to have the pathways follow the hallways. This is considered the best practice so that when a new cable needs to be added, it can easily be connected to the pathway.
Pulling the Cable
The whole reason you take the time to plan out pathways is so that you can efficiently install the cable. After gathering and setting up all the materials, the cable is attached to a glow rod to help with the cable pulling. Since the glow rod extends to about eight feet, you will make your first pull, move your ladder, and repeat this step until the cable pull is complete. During the pull, you need to make sure that you will be able to secure the cable along the path so that it doesn’t touch other things in the ceiling, including pipes, duct work, electrical wires, or lights.

While running the cable to the closet, it’s important to make sure there is plenty of slack left right above the closet and where the AP will be mounted. Ensuring that there is enough slack with the cable will allow for any adjustments that are needed after the cable run is done. Once the cable is fully pulled, the next step is to back track from the closet to the AP, securing the cable with zip ties along the way. As it is being secured, it is best to keep the cable as straight as possible with almost no slack between the zip ties. After making any necessary adjustments to the pull, you can cut the cable from the cable box. Then you are ready to install the access point.
Offices vary in size and the number of access points they might need. Because every office setting will have different requirements, knowing these guidelines and best practices for materials, pathways, and cabling will help make cable installs quick and efficient which, in the end, will save both time and money.