Home Screen
Users can build up Presets and Target Servers in order to run tests. Build out one or many Presets to easily pick and run tests with certain parameters. Add and save Target Servers to easily run tests to the same machines under different conditions.
Choose a Preset. Then choose one or multiple Target Servers to add that test to the Queue.
Users run the same test to the same Target Server multiple times, simply keep selecting the Target Server. Users can also change a Preset to add to the Queue by selecting a new Preset, then selecting a Target Server.
Presets
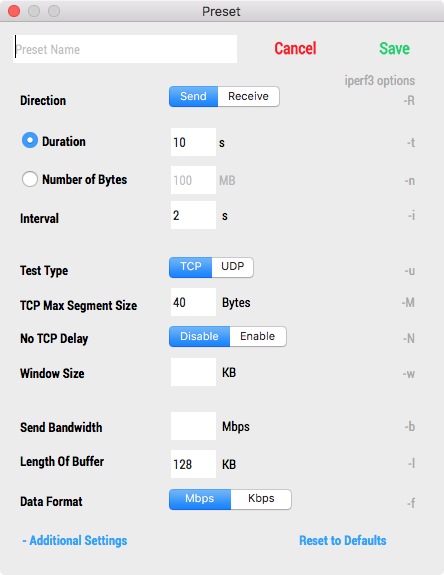
Presets hold all the test settings that will be used. Create and name varying Presets to allow for different kinds of tests to be run.
Basic Settings
- Direction (Data is sent to or received from Target Servers)
- Duration (Total time of testing in seconds)
- Number of Bytes (Total amount of Data sent during test in megabytes)
Additional Settings
- Interval (Sample results back at second intervals throughout tests)
- Test Type (TCP or UDP based tests)
- TCP Max Segment Size (Attempt to set the TCP maximum segment size (MSS))
- No TCP Delay (Set the TCP no delay option, disabling Nagle's algorithm.)
- Window Size (Sets the socket buffer sizes to the specified value)
- Send Bandwidth (Set target bandwidth to "n" Mbps)
*Note* - UDP Bandwidth default is 1.05 Mbps, to change it to "unrestrained/unlimited" then enter "0" - Length of Buffer (The length of buffers to read or write)
- Data Format (Determines how the results will be displayed)
The right hand side of the Preset Window shows the corresponding iPerf3 command line options that represent each Setting. For more information, simply hover over the iPerf3 option that you would like to learn more about.
Edit Cog
Allows users to make changes to created Presets, as well as remove them from the list.

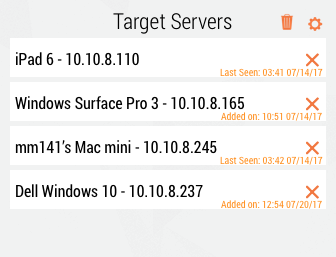
Target Servers
All of the testing devices are to be added to this list. Apple devices utilizing Bonjour Services will automatically appear in this list when connected to the same network. Users can add Target Servers to this list, which will be saved from session to session.
Users can also choose multiple Target Servers or multiple of the same Target Server to the Queue. When a Target Server (with a Preset already selected) is chosen and added to the Queue, it will be highlighted in blue. If the same Target Server is added to the queue multiple times, a number indicator will let the user know how many times it will be tested.


Add New Target Server
Enter the IP Address of a Target Server that will be used to test to.
By default, the port on Target Servers will be 5201.
Server Name is used to easily identify exactly which devices are being tested.
Use the "+" symbol to add more sections to add multiple Target Servers at one time.
Enter IP Address / Port Number / Server name

Edit Cog
Allows users to make changes to created Target Servers, as well as remove them from the list.
"Last Seen" indicates the last time a Target Server using Bonjour services was seen by WiFiPerf Professional.
"Added On" indicates when a Target Server was added by a user manually.
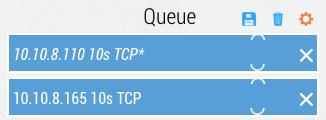
Queue
Select a Preset, then select a Target Server, and the test will be added to the Queue. The Queue holds all the tests that will be run. Once in the Queue, tests can be rearranged, joined, and edited.
Once all the tests are added to the Queue that need to be tests, hit start and they will test consecutively from top to bottom.
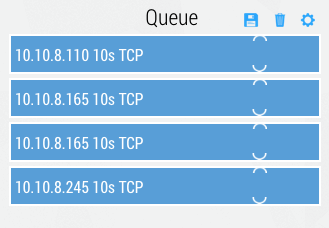
Drag and drop tests to rearrange the testing order.
Use the half circle icons to join tests that have different Target Servers. When joined (white circle) the tests will run simultaneously. This is a way to test how bandwidth in handled when divided up between varying clients running at the same time.

While running the tests, pending icon(s) will appear on the tests currently in progress. If and when a test is completed successfully, it will be adorned with a check mark. If a test fails, for whichever reason, it will be adorned with an exclamation point. The user can click on the exclamation point to view what went wrong in the test.
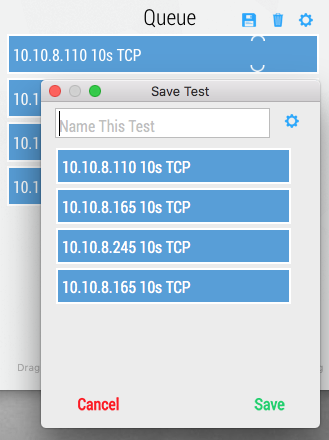
Save
Allows users to save all the tests in the Queue to the My Tests screen. If a user wants to run the same tests everyday to the same Target Servers, they can save it to My Tests for ease and convenience.
Pop up window allows users to make final edits and name the test to be added to My Tests.
Trash Can
Allows users to delete all the tests in the Queue. Users can also drag and drop individual tests onto the Trash Can to delete single tests.

Edit Cog
Allows users to change the Preset settings to individual tests. This helps users assign general test settings to multiple Target Servers quickly and easily, then the user can go in to customize each one if theyd like without having to create new Presets.
Edited Tests in the Queue will be italized with an "*" asterick to indicate its been changed from the names Preset.