In this blog post we will cover how to configure a Linux device such as a Raspberry Pi computer as a remote WiFi Scanner. Our setup uses our Windows based WiFi Scanner on a Windows 10 laptop.
The Windows WiFi Scanner connects the the local or remote Raspberry Pi via SSH to transmit WiFi scanning results from the Raspberry Pi to the Windows WiFi Scanner for display.
The benefits of this setup are below.
- Linux device can be local or remote as long as SSH access to device is available.
- Linux device can be low cost device like a Raspberry Pi.
- Leverage wide selection of USB wireless adapter support available for Raspberry Pi devices and operating system.
Below blog post was tested on following hardware and software.
Note: Raspberry Pi 3 B Plus and 4 B have been tested but this process should work for Raspberry Pi 0, 1, 2, 3 and Compute Module (CM)
- Comfast CF-912AC 1200MBPS Realtek Dual Band USB WiFi Network Adapter
- Raspberry Pi Imager to create micro SD card image of Raspberry Pi OS (32 bit) Released 2021-01-11
- Raspberry Pi Realtek drivers for Comfast CF-912C or D-Link DWA-171. Any adapter that is compatible with Realtek RTL8812AU drivers should work.
- WiFi Scanner for Windows 2.3 or newer. Click to download 7 day free trial.
Raspberry Pi Setup Process
1) Image a micro SD card using the Raspberry Pi Imager. Select latest Raspberry Pi image with Desktop. In our case it was Release 2021-01-11.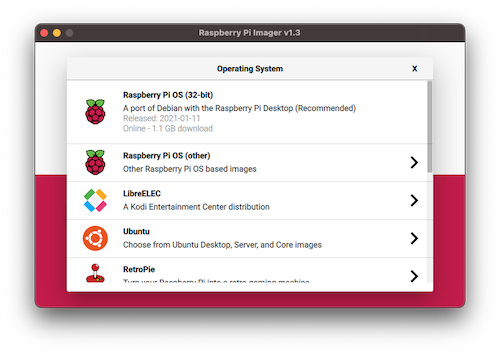
2) After SD card has been imaged insert into Raspberry Pi along with compatible external USB card that support monitor mode. In case we are using a Comfast CF-912AC adapter. Power on the Raspberry Pi with keyboard, mouse, and monitor for easy setup after boot up.
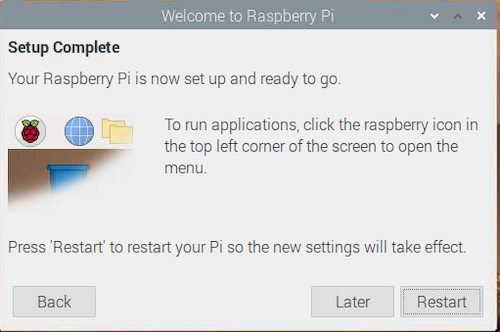
3) Follow the Raspberry Pi setup process to select language, password, and connect to network (via wired or wireless), and update software. Restart devices once update has completed.
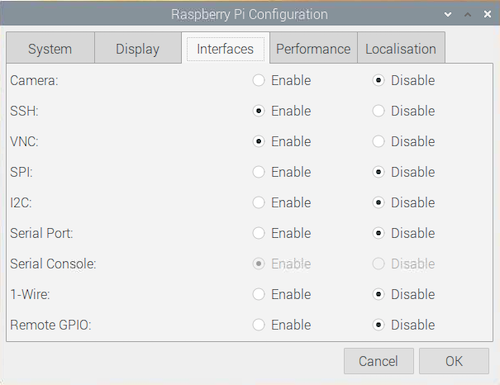
4) Once update has completed and device rebooted enable SSH and VNC via Raspberry Pi Start icon > Preferences > Raspberry Pi Configuration > Interfaces

4) SSH, Remote Desktop vi VNC, or via Desktop > Terminal update software repository using command below.
sudo apt-get update
5) Tcpdump will be used to remotely capture wireless packets and then processed by WiFi Scanner for Windows. Install tcpdump using command below.
sudo apt-get install tcpdump
Output should look like below for installation.
pi@raspberrypi:~ $ sudo apt-get install tcpdump
Reading package lists... Done
Building dependency tree
Reading state information... Done
The following additional packages will be installed:
libpcap0.8
Suggested packages:
apparmor
The following NEW packages will be installed:
libpcap0.8 tcpdump
0 upgraded, 2 newly installed, 0 to remove and 0 not upgraded.
Need to get 449 kB of archives.
After this operation, 1,118 kB of additional disk space will be used.
Do you want to continue? [Y/n] Y
Get:1 http://mirror.umd.edu/raspbian/raspbian buster/main armhf libpcap0.8 armhf 1.8.1-6 [124 kB]
Get:2 http://mirror.umd.edu/raspbian/raspbian buster/main armhf tcpdump armhf 4.9.3-1~deb10u2 [325 kB]
Fetched 449 kB in 1s (671 kB/s)
Selecting previously unselected package libpcap0.8:armhf.
(Reading database ... 98535 files and directories currently installed.)
Preparing to unpack .../libpcap0.8_1.8.1-6_armhf.deb ...
Unpacking libpcap0.8:armhf (1.8.1-6) ...
Selecting previously unselected package tcpdump.
Preparing to unpack .../tcpdump_4.9.3-1~deb10u2_armhf.deb ...
Unpacking tcpdump (4.9.3-1~deb10u2) ...
Setting up libpcap0.8:armhf (1.8.1-6) ...
Setting up tcpdump (4.9.3-1~deb10u2) ...
Processing triggers for man-db (2.8.5-2) ...
Processing triggers for libc-bin (2.28-10+rpi1) ...
pi@raspberrypi:~ $
5) The Comfast CF-912ac adapter has a Realtek chipset and 8812au driver is needed to work with Raspberry Pi OS and tcpdump. Install drivers for Comfast Realtek adapter by using following commands. This software will download install script and script will detect Raspberry Pi model and WiFi adapter model and install correct drivers.
sudo wget http://downloads.fars-robotics.net/wifi-drivers/install-wifi -O /usr/bin/install-wifi
Output should look like below for download
pi@raspberrypi:~ $ sudo wget http://downloads.fars-robotics.net/wifi-drivers/install-wifi -O /usr/bin/install-wifi
--2021-02-07 20:58:43-- http://downloads.fars-robotics.net/wifi-drivers/install-wifi
Resolving downloads.fars-robotics.net (downloads.fars-robotics.net)... 82.68.133.179
Connecting to downloads.fars-robotics.net (downloads.fars-robotics.net)|82.68.133.179|:80... connected.
HTTP request sent, awaiting response... 200 OK
Length: 22276 (22K)
Saving to: ‘/usr/bin/install-wifi’
/usr/bin/install-wi 100%[===================>] 21.75K 47.7KB/s in 0.5s
2021-02-07 20:58:44 (47.7 KB/s) - ‘/usr/bin/install-wifi’ saved [22276/22276]
Change script permissions and run script
sudo chmod +x /usr/bin/install-wifi
sudo install-wifi
script will output should look like below for install
pi@raspberrypi:~ $ sudo install-wifi
*** Raspberry Pi wifi driver installer by MrEngman.
*** Performing self-update
*** Relaunching after update
*** Raspberry Pi wifi driver installer by MrEngman.
Your current kernel revision = 5.10.11-v7+
Your current kernel build = #1399
Checking for a wifi module to determine the driver to install.
Your wifi module is Bus 001 Device 004: ID 0bda:8812 Realtek Semiconductor Corp. RTL8812AU 802.11a/b/g/n/ac 2T2R DB WLAN Adapter
And it uses the 8812au driver.
Your Pi revision number is a020d3
You have a Pi 3B+ v1.3
Checking for a 8812au wifi driver module for your current kernel.
There is a driver module available for this kernel revision.
Downloading the 8812au driver, 8812au-5.10.11-v7-1399.tar.gz.
Installing the 8812au driver.
Installing driver config file 8812au.conf.
mv 8812au.conf /etc/modprobe.d/.
Installing driver module 8812au.ko.
install -p -m 644 8812au.ko /lib/modules/5.10.11-v7+/kernel/drivers/net/wireless
Syncing changes to disk
A version of the 8812au driver is already loaded and running.
You will need to reboot to load the new driver, 8812au.ko.
pi@raspberrypi:~ $
6) Configure permissions to allow Raspberry Pi user ID "pi" to run tcpdump. Without this change remote WiFi scanning will not work.
sudo groupadd pcap
sudo usermod -a -G pcap $USER
sudo chgrp pcap /usr/sbin/tcpdump
sudo chmod 750 /usr/sbin/tcpdump
sudo setcap cap_net_raw,cap_net_admin=eip /usr/sbin/tcpdump
Output
Last login: Mon Feb 22 20:01:25 2021 from 172.16.12.180
wlanpi@wlanpi:~$ sudo groupadd pcap
We trust you have received the usual lecture from the local System
Administrator. It usually boils down to these three things:
#1) Respect the privacy of others.
#2) Think before you type.
#3) With great power comes great responsibility.
[sudo] password for wlanpi:
wlanpi@wlanpi:~$ sudo usermod -a -G pcap $USER
wlanpi@wlanpi:~$ sudo chgrp pcap /usr/sbin/tcpdump
wlanpi@wlanpi:~$ sudo chmod 750 /usr/sbin/tcpdump
wlanpi@wlanpi:~$ sudo setcap cap_net_raw,cap_net_admin=eip /usr/sbin/tcpdump
wlanpi@wlanpi:~$
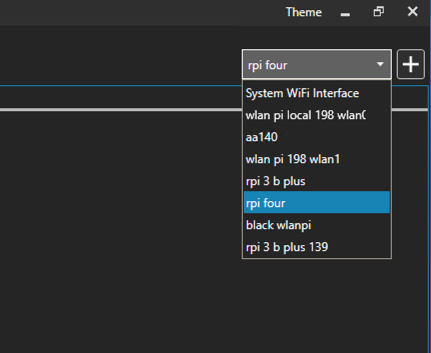
8) Configure remote WiFi scanner in windows and test configuration via WiFi Scanner > Preferences > Remote WiFi Scanner tab or click "+" button next to System WiFi Interface to access this tab.
Enter the IP address or host name of remote or local Raspberry Pi. The default port is 22 but can be any port that is directed to SSH on the Raspberry Pi.
The wireless lan interface should be wlan1 or whichever interface is the Comfast adapter or other compatible Realtek 8812au adapter.
Username password should be pi and raspberry unless you changed password during or after initial setup.
Save/Update the configuration as needed.
Then, click Test Configuration to confirm settings and availability of all commands needed for this setup. Be patient this process can take several seconds to complete.

9) Log of results should look like below with all test passing. The configuration test checks for required hardware and software for remote WiFi scanning. If all tests pass and return information then we are 99% sure that remote WiFi scanning will work for your setup.
Checking SSH connection to IP: 172.16.12.120 Port:22....: Pass
Checking Username: wlanpi Password: ****** ..........: Pass
Checking device hardware model........: FriendlyARM NanoPi NEO Core2
Listing USB adapters / hardware connected to your device.:
Bus 008 Device 001: ID 1d6b:0001 Linux Foundation 1.1 root hub
Bus 004 Device 002: ID 0bda:8812 Realtek Semiconductor Corp. RTL8812AU 802.11a/b/g/n/ac 2T2R DB WLAN Adapter
Bus 004 Device 001: ID 1d6b:0002 Linux Foundation 2.0 root hub
Bus 007 Device 001: ID 1d6b:0001 Linux Foundation 1.1 root hub
Bus 003 Device 001: ID 1d6b:0002 Linux Foundation 2.0 root hub
Bus 006 Device 001: ID 1d6b:0001 Linux Foundation 1.1 root hub
Bus 002 Device 001: ID 1d6b:0002 Linux Foundation 2.0 root hub
Bus 005 Device 001: ID 1d6b:0001 Linux Foundation 1.1 root hub
Bus 001 Device 001: ID 1d6b:0002 Linux Foundation 2.0 root hub
Bus 009 Device 001: ID 1d6b:0002 Linux Foundation 2.0 root hub
Checking for root user access.....................: Pass
Checking for iwconfig command.....................: Pass
Checking for iw command...........................: Pass
Checking for iwlist command.......................: Pass
Checking for ifconfig command.....................: Pass
Checking for tcpdump command......................: Pass
Checking for network interfaces...................: lo eth0 usb0 wlan0
Checking for configured interface wlan0 on device.: Pass
Checking if wlan0 is available for use............: Pass
Checking for monitor mode on wlan0 interface......: Pass
Checking for tcpdump capture on wlan0.............: Pass
Checking for supported channels on wlan0..........: Pass
Supported channels are:
Channel 01 : 2.412 GHz
Channel 02 : 2.417 GHz
Channel 03 : 2.422 GHz
Channel 04 : 2.427 GHz
Channel 05 : 2.432 GHz
Channel 06 : 2.437 GHz
Channel 07 : 2.442 GHz
Channel 08 : 2.447 GHz
Channel 09 : 2.452 GHz
Channel 10 : 2.457 GHz
Channel 11 : 2.462 GHz
Channel 12 : 2.467 GHz
Channel 13 : 2.472 GHz
Channel 36 : 5.18 GHz
Channel 40 : 5.2 GHz
Channel 44 : 5.22 GHz
Channel 48 : 5.24 GHz
Channel 52 : 5.26 GHz
Channel 56 : 5.28 GHz
Channel 60 : 5.3 GHz
Channel 64 : 5.32 GHz
Channel 100 : 5.5 GHz
Channel 104 : 5.52 GHz
Channel 108 : 5.54 GHz
Channel 112 : 5.56 GHz
Channel 116 : 5.58 GHz
Channel 120 : 5.6 GHz
Channel 124 : 5.62 GHz
Channel 128 : 5.64 GHz
Channel 132 : 5.66 GHz
Channel 136 : 5.68 GHz
Channel 140 : 5.7 GHz
*****Configuration Check Completed *****
Note any issues with test configuration results. If you have followed all instructions and setup is not working use copy/paste icon to copy test log and send to support@accessagility.com for guidance on potential issues.
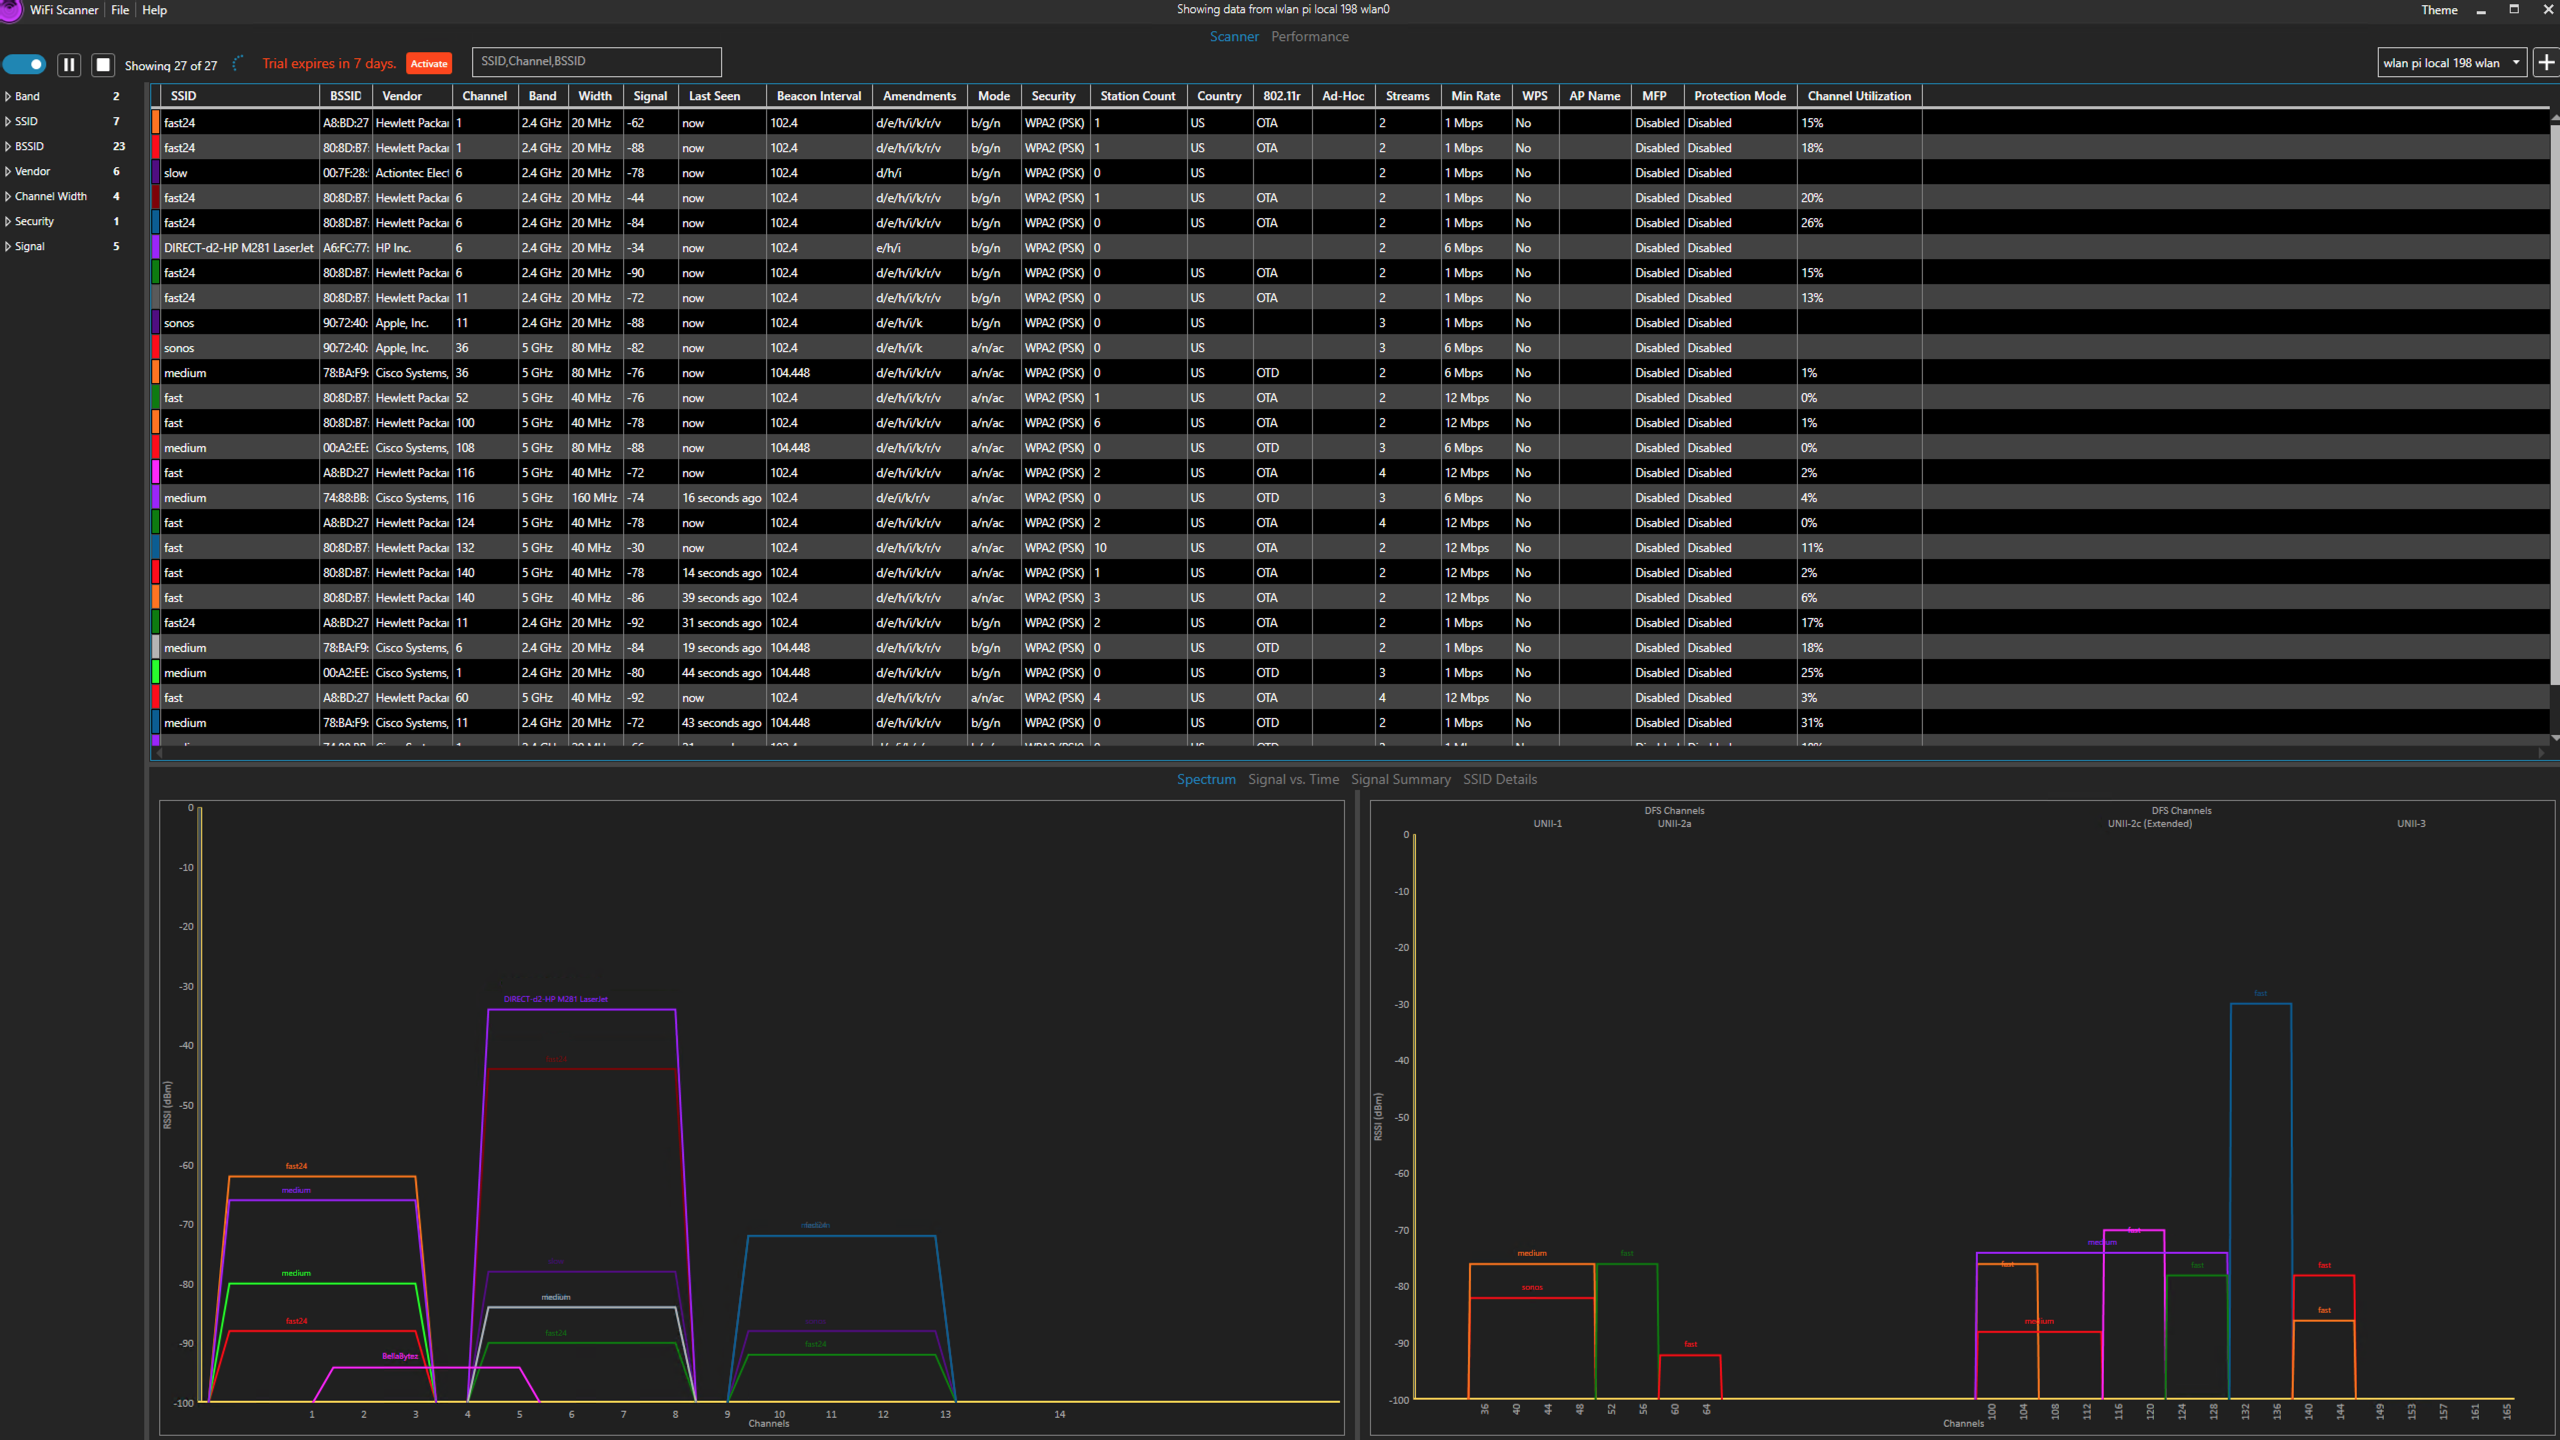
9) Select Remote WiFi Scanner in WiFi Scanner for Windows
10) Windows WiFi Scanner will connect to Linux device over SSH and run tcpump for confgured wireless interface (wlan1) and send results to WiFi Scanner for display. WiFi Scanner will cycle through all supported channels every 100ms and repeat until scanning is paused/stopped.