WiFi Scanning with AirPort Utility
This guide will explain the process of using AirPort Utility’s WiFi scanning capabilities for surveying on the iPad. As of the creation of this document, Apple does not allow third-party apps to perform WiFi scanning. However, with app data sharing, we have leveraged Apple’s scanning ability for our own use in WiFi Survey.
Setup
Download AirPort Utility and WiFi Survey.
IMPORTANT: Open WiFi Survey and the project you will be working on (or setup a new one). WiFi scan data will only be received and stored when WiFi Survey is running and a project is OPEN.
Go to the Settings on the iPad, scroll down to AirPort Utility and turn on Wi-Fi Scanner.

WiFi Scanning
Open AirPort Utility and click Wi-Fi Scan in the top right.

Optional: Select a Scan Duration
Click Scan in the top right

When the scan is finished, click on the share icon in the bottom left, then click the top More icon.

Check on WiFi Survey and click Done.

Back in the Share options, WiFi Survey should now appear. Click on WiFi Survey.

Click Post to send this information to WiFi Survey.

REMEMBER - Your project MUST be open in WiFi Survey, otherwise these results will not be "posted" anywhere.
The Walking Man: Placing Scan Data in WiFi Survey
Once you have sent scan data from AirPort Utility to WiFi Survey, navigate to WiFi Survey and you will notice a blue circle with a number in it over top the Walking Man. This number indicates the number of scan lists sent to the app.
For example, if you have posted four scans, it should read 4.

Click the Walking Man and select the area of the map where the first scan was completed. This places the first set of scanned data onto the map and the number in the blue circle should go down by one.

Continue placing data points where they have been collected on the map to create the survey.

Calibrate the Map
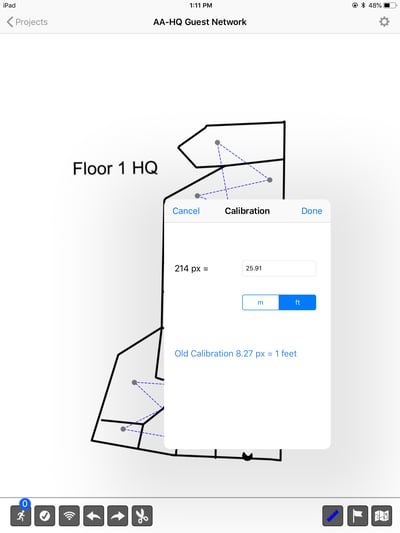
If you have not already done so, calibrate the map using the Ruler tool.
With the Ruler selected, press and hold on a wall or area where the distance is known. Drag across the screen and release to calibrate. Maps can be recalibrated for distance at any time using the Ruler tool.

Set Heat Map Boundaries
Click the Flag icon to set the Survey Boundaries you want.

Using the Heat Map
Click the Map icon in the top right to select a SSID and view its heat map signature.

Here is an example of the heat signature:

You can view scan data by selecting a specific data point.

WiFi scans can be sent to WiFi Survey and then immediately placed, or you can build up scans. Just note that you must remember where each sequential scan took place and there is a possibility of losing the data before you place it. It is recommended to stay under five posted scans at a time, place them in WiFi Survey, then continue scanning.


